Platform Documentation
Buckets
Introduction : With Buckets, you have the power to shape your digital world. Our flexible schema allows you to create tailored templates and fields, perfectly suited to your specific needs. Unlock your creativity and build stunning, dynamic content experiences.
What are Buckets?
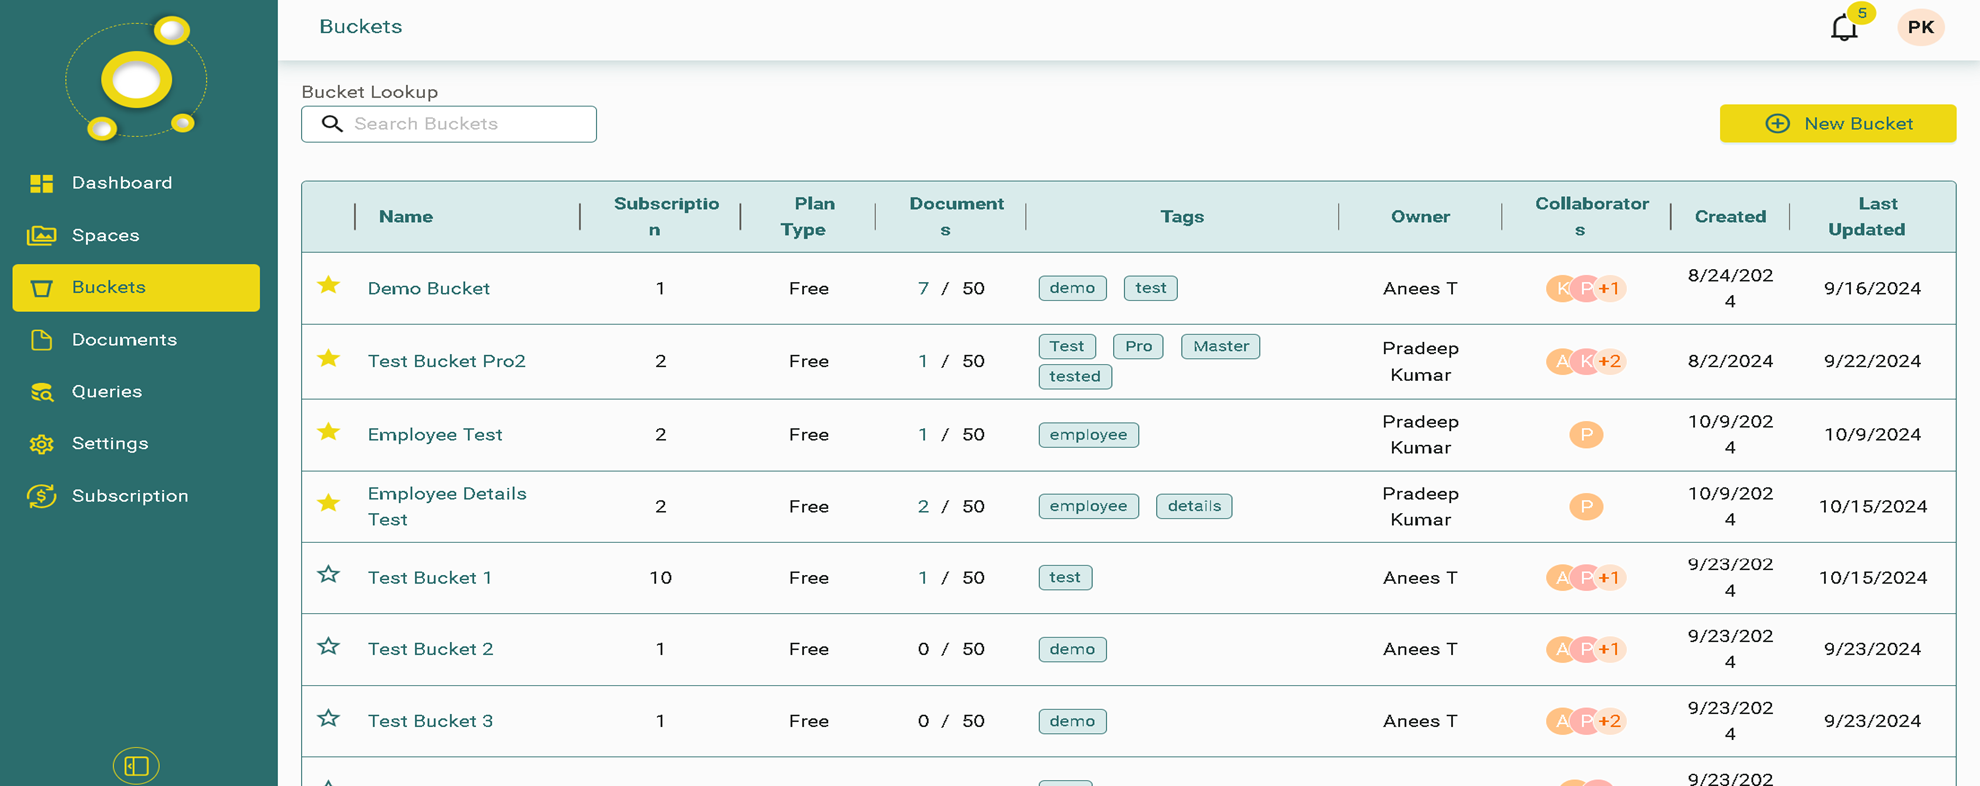
Take control of your projects with Buckets. Our flexible system allows you to create custom fields and organize your documents in a way that suits your needs. With features like tagging, collaboration, and detailed timestamps, you'll always know where your files are. The bucket consists of several fields, listed below:
- Name - It displays the name of the bucket you've created.
- Subscription - The subscription options are displayed in this section.
- Plan Type - You can choose various plans according to your subscription.
- Documents - These show all the documents that you've created in your Buckets section of the website.
- Tags - You can add tags to your bucket, to quickly access your bucket.
- Owner - The name of the owner of a particular bucket is displayed here.
- Collaborators - This will show all the names of the collaborators that are working on the same project.
- Created(Date & Time) - It displays the date on which a particular bucket is created.
- Last Updated(Date & Time) - It displays the date you made changes to your bucket.
Create a New Bucket
To add a new bucket to your project, take the following steps:
Visit the Bing CMS website, and Login with your credentials.
Click on Buckets on the left panel.
On the buckets page, there are two options:
Bucket Lookup - Here you can access your previous buckets.
Bucket Lookup Button -
- "+New Bucket" - Create a new bucket
New Bucket Button -
- To create a new bucket, simply click on the "+New Bucket" button on the top right corner of the website.
- Once you click the "+New Bucket" button, you can easily create a bucket of your choice.
- Once you click on "+New Bucket" button, you will be taken to a webpage where you can edit and create an overview for your project.
Create a Bucket
The first drop down menu contains the type of your subscription plan: Based on your subscription plan, you can access the content, and make use of buckets to manage and deploy your projects. - Free - Paid
The second option is auto-generated, and it shows the total number of buckets that you have created.
The third option shows the total number of buckets that you can create.
The fourth option is an input field, where you can add the name of your bucket as per your project needs.
Once you enter the name of your bucket, the "+Create" button is activated.
Finally, you can add tags for easy retrieval and access to your bucket.

After you click the "+Create" button.
- Once you click the "+Create button", a new bucket is created.
- To edit the fields inside the bucket, click on the "Edit" button.
- Once you click on the "Edit button", in the bottom center of the screen, a new button pops-up labelled "+Add More Fields".
Add More Fields
When you click on the +Add more fields buttons, you are provided with following options:
- First Option is the field name.
- Second Option is the Datatype of your field.(like: text, list, nested objects, etc.)
- Third Option is to select mandatory fields for your project.
- Fourth Option is to delete a field.
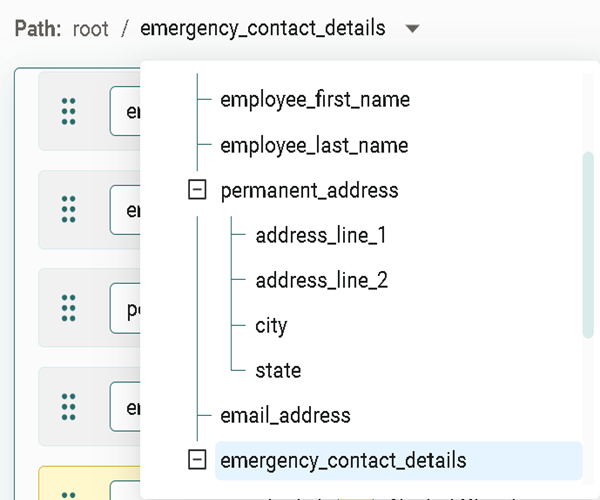
View Path

- Click on the path option, on the top left corner of the screen.
- Click on the drop-down menu.
- There you can see the hierarchy of your Bucket, with several fields.
- To access a particular field, simply click on it, and it will take you to that field.
Edit a bucket

- To Edit a bucket, you can click on the "Edit" Button on the top left corner of the webpage.
- Once you click Edit, "+ Create New field" button is activated at the bottom of the webpage.
- To create a field, click on "+ Create New Field" button.
- A field is generated, now you can name the field and make changes to your bucket.
On the top right corner of the screen, you are presented with two options:
- Schema - Displays the hierarchy of your different fields.
0:
{
  "fieldId": "4f848626-7e0d-4d41-a028-df7c67...",
  "fieldName": "id",
  "fieldType": "number",
  "required": true,
  "dropDownValues": [],
  "multiSelectValues": [],
  "nestedList": [],
  "nestedObject": {}
}
- JSON -Displays the structure of your fields in JSON format.
{
  "createdDate": "string",
  "email_address": "string",
  "emergency_contact_details": {},
  "previous_companies": [
    {
      "name_of_company": "string"
    }
  ],
  "employee_last_name": "string",
  "id": 0,
  "updatedDate": "string",
  "permanent_address": {},
  "employee_first_name": "string",
  "contact_number": 0
}
To create a New Field
To create a New Field, click on "+Add More Fields" Button
Enter the name of the field you wish to enter. You can add letters in both upper case and lower case with and without spaces. Note: The bucket name should not contain any special characters.
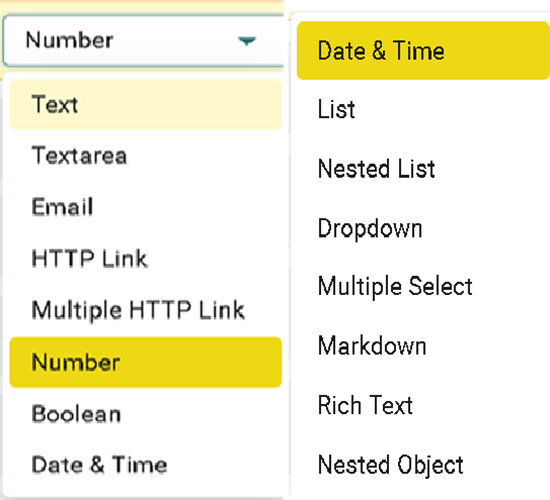
Next, you choose the datatype of the bucket-type in which you wish to store data.
In the drop-down menu, select the datatype in which you wish to represent and store your data.
- You are given the option to choose items which are mandatory.
- After choosing mandatory fields, you can save the changes by clicking on the "Save" button next to "+Add More Fields" button.
- Note: These fields will be mandatory to fill, later when you add data to your buckets schema.
Drop-down Datatypes:
- Text
- Text-area
- HTTP link
- Multiple HTTP link
- Number
- Boolean
- Date & Time
- List
- Nested List
- Drop-Down
- Multiple Select
- Markdown
- Rich Text
- Nested Object
Data Types

This section outlines common data types used in form inputs, APIs, or database schemas, detailing their characteristics, expected formats, and use cases.
Text
Description:
A single-line input field that accepts short, free-form textual data.
Use Cases:
- Names
- Titles
- Short descriptions
- Single-line input
Format:
Any UTF-8 string. Typically limited in length based on system requirements.
Validation Examples:
- Maximum character length
- Prohibited characters (e.g., symbols)
Text Area
Description:
A multi-line input field for entering longer text content. Used when more space is needed than a basic text field.
Use Cases:
- Comments
- Descriptions
- Multi-line input
Format:
Any UTF-8 string, typically without a character limit.
Validation Examples:
- Maximum or minimum word/character count
- Specific formatting rules (e.g., paragraph structure)
Description:
An input field specifically designed for email addresses. Validates the structure of the email.
Use Cases:
- User email input
- Contact forms
- Login/registration forms
Format:
Must follow the standard email format (e.g., [email protected]).
Validation Examples:
- Email pattern validation using regular expressions
- Domain-specific email rules (e.g., disallow certain domains)
HTTP Link
Description:
An input field that accepts a single HTTP/HTTPS URL.
Use Cases:
- Website links
- Profile URLs
- Resource links
Format:
Must follow the HTTP or HTTPS URL structure (e.g., https://www.example.com).
Validation Examples:
- URL format validation
- Verifying if the URL is active or reachable
Multiple HTTP Links
Description:
An input field that accepts multiple HTTP/HTTPS URLs.
Use Cases:
- Entering multiple links (e.g., portfolio links, resources)
Format:
A list of URLs, each following the HTTP/HTTPS format.
Validation Examples:
- Each entry follows valid URL formatting
- Number of URLs allowed (e.g., maximum of 5 links)
Number
Description:
An input field that accepts numeric values, which can be integers or floats.
Use Cases:
- Age
- Quantity
- Pricing or monetary values
Format:
- Integer (e.g.,
123) - Float (e.g.,
123.45)
Validation Examples:
- Minimum and maximum value limits
- Positive numbers only
Boolean
Description:
Represents a field that accepts either true or false.
Use Cases:
- Yes/No questions
- Checkbox states (checked/unchecked)
Format:
Accepts values such as:
TrueorFalse1or0YesorNo
Validation Examples:
- Value must be one of the predefined boolean states
Date & Time
Description:
An input field that captures date, time, or both.
Use Cases:
- Scheduling (e.g., appointments, events)
- Date of birth
- Timestamps
Format:
- Date:
YYYY-MM-DD - Time:
HH:MM:SS - Date and Time:
YYYY-MM-DDTHH:MM:SSZ
Validation Examples:
- Ensure valid date/time format
- Date ranges (e.g., cannot be a past or future date)
List
Description:
An input that accepts a collection of items, typically stored as an array.
Use Cases:
- Tags
- Categories
- Options in multi-choice fields
Format:
A list or array of strings, numbers, or other data types.
Validation Examples:
- Maximum length of the list
- Duplicate entries allowed or disallowed
Nested List
Description:
A list where each item can itself be another list (multi-dimensional arrays).
Use Cases:
- Complex data structures like directories and sub-directories
- Hierarchical data (e.g., categories and subcategories)
Format:
An array of arrays (e.g., [[1, 2], [3, 4], [5]]).
Validation Examples:
- Ensure proper nesting depth
- Length and content validation for each sub-list
Add Nested List Click on "+Add Nested field" option to create the Nested object or datatype.
Drop-Down
Description:
A form control that allows users to select one value from a predefined list of options.
Use Cases:
- Select countries, states, or categories
- Single-choice form questions
Format:
A fixed set of values provided in a list, where the user can choose one.
Validation Examples:
- Ensure the selected option is from the available list
Multiple Select
Description:
A form control that allows users to select multiple values from a predefined list of options.
Use Cases:
- Select multiple skills, categories, or tags
- Multi-choice form questions
Format:
A list of strings or values from which multiple can be selected.
Validation Examples:
- Ensure all selected values are valid
- Limit on the number of selectable options
Markdown
Description:
An input field that accepts Markdown-formatted text, allowing for simple text styling (e.g., bold, italic, lists).
Use Cases:
- Blog posts
- Documentation
- Notes
Format:
Text input formatted with Markdown syntax (e.g., **bold**, *italic*, # Heading).
Validation Examples:
- Ensure valid Markdown syntax
- Strip or sanitize unwanted HTML
Rich Text
Description:
An input field that allows for the styling of text using a rich text editor (e.g., bold, italic, bullet points, links).
Use Cases:
- Content management systems
- Blog editors
- Detailed text formatting
Format:
Styled text, often stored as HTML or with rich text formatting tags.
Validation Examples:
- Strip or sanitize unwanted HTML or scripts
- Ensure text remains within character limits even with formatting
Nested Object
Description:
Represents a complex data structure where an object contains other objects or arrays as properties.
Use Cases:
- JSON data structures
- APIs returning complex data
- Storing related data together (e.g., user profile with contact details)
Format:
A JSON object that can have nested objects or arrays:
{
  "user": {
    "name": "John",
    "contacts": {
      "email": "[email protected]",
      "phone": "123-456-7890"
    }
  }
}
Validation Examples:
- Ensure proper structure and nesting levels
- Validate each nested object's schema or format
Access Schema
To access the schema of your buckets, click the "Schema button" on the top-left corner of the buckets section.
Access JSON
To access the JSON of your buckets, click the "JSON button" next to "Schema" button.